Edit: Late to the Party
Looks like I wasn’t the first one to come up with this idea. Some bright folks over on reddit have pointed out tmate, a fork of tmux purpose-built to facilitate precisely the same process described in this guide (and with far more sophisticated security measures, from the looks of it).
It comes with a lot of nifty features, like a web interface for you to view the shared session in your browser.
Unfortunately, it looks like the project has hardly been touched for almost two years. No reason it won’t get the job done, though, and it’ll save you loads of time over reading through this mess.
Traditionally, pair programming is done in person, with two engineers sitting side-by-side at the same computer — but I think I speak for all of us when I say that seeing other humans face-to-face isn’t the reason I got into this business.
And yet, if you’ve ever tried to arrange a remote pair programming session, you might have found your fondness for personal space outweighed by the debilitating rage of working (or observing someone else work) on a laggy interface hampered by a stuttering, unreliable connection.
Well, I don’t have a solution for network latency. What I do have is a remote pair programming setup using ssh and tmux, so that at the very least, you can suffer in the quiet dignity of a native terminal window.
Why?
At the time of this writing, the hottest tool for remote pairing appears to be Floobits, while the easiest is screenshare or remote desktop (e.g., ScreenHero). So why would you choose ssh + tmux over these guys?
- It’s free (beer, speech, whatever — no third-party services required).
- The video resolution never degrades, unlike a screenshare.
- The terminal captures more of your workflow (e.g., debugging) than Floobits can.
On the other hand…
- It’s more work to set up.
- Obviously, you’re constrained to the terminal. That means:
- you’re stuck with vim or emacs and Unix as IDE;
- communication must be handled separately; and
- sharing of GUI windows (e.g., the browser) must be handled separately.
- It’s easy to get the security implementation wrong.
You’ve been warned.
A Naive Solution
Let’s suppose Bojack and Todd want to pair together. They’re on the same local
network, so their computers are discoverable at <hostname>.local. Bojack has
already authorized Todd to log into his account over SSH, so all he has to do
is start a new tmux session and wait for Todd to join:
# HOST =========================================================================
bhorseman@scotch:~$ tmux new -s pair

# GUEST ========================================================================
tchaves@trees:~$ ssh bhorseman@scotch.local
bhorseman@scotch:~$ tmux attach -t pair
Voilà! Now Bojack and Todd are attached to the same tmux session on Bojack’s computer (think remote desktop, but in the terminal).
So what’s wrong with this?

Security
Todd now has access not only to Bojack’s computer, but to his user account.
That means all his files, GPG keys, SSH keys, and more. Sure, Bojack and Todd
are good friends, and Todd would never do anything to sabotage Bojack on
purpose. But Todd’s really not the sharpest tool in the shed. What if after
they finish pairing, Todd forgets he’s still logged in, sees a bunch of files
he doesn’t recognize, thinks “I don’t need these,” and then rm -rfs them?
You may have noticed that we also totally glossed over how Bojack granted Todd login authorization in the first place.
Accessibility
Setting up this connection is easy and relatively secure because Bojack and Todd are on the same LAN — but that’s generally not the case for people who want to pair program remotely. To actually make this a remote solution, we have to set Bojack’s computer up to accept incoming connections over the Internet.
(Okay, so maybe there aren’t that many problems on its face, but fixing either of these things opens up a whole other can of worms.)
A Better Way, in Broad Strokes
Let’s go over the what and why before we get into the how.1
Todd
We can trust Todd not to do anything evil, but we can’t trust him not to do anything stupid. Let’s make a new user account for him.
Except tmux isn’t a multi-user program by default (and for good reason — it’d
be like su <user> without a password prompt). Which means now that he has
his own account, Todd won’t be able to tmux attach to Bojack’s session
anymore. Luckily, someone has already written a bash script called wemux
to solve just this problem.
If we really don’t trust Todd, we can consign him to a read-only tmux session (think screenshare vs. remote desktop).
Incoming connections
⚠️ Caution: Bumpy analogy ahead
Bojack hasn’t set up his personal development machine to allow incoming connections from the Internet. That means there’s a firewall and a NAT standing between him and the vast, hostile wilderness, just as God intended.
These security mechanisms are the front gate to Horseman Manor, except we want to bypass them and leave it open so Todd can drive straight up to the door of the guest room (which he’s got the key for). Only, there’s a horde of robot burglars patrolling the streets, driving onto anyone’s property they can, scoping out all the different ways there are to get inside everyone’s houses.
So, Bojack has another idea. He owns a restaurant where there is no front gate. Anyone is free to drive onto the lot already (because it’s a business establishment that serves the public) — and besides, neither of them lives there, so security is not their problem. Every time Todd wants to come over, Bojack reserves a special loading bay in back of the restaurant where Todd can hop onto a shuttle bus and catch a ride back to the house.
This way, the manor stays behind a closed front gate (NAT) at all times. We don’t have to worry about what happens if Todd’s car (laptop) gets stolen with the keys to the guest house (SSH private key) inside: we’re only offering rides back to the house (reverse tunnel) an on an ad hoc basis, and if anything fishy happens, Todd can just let us know we need to change the locks.
And if we’re feeling extra paranoid, we can always board up the windows and fire that doorman that lets people in when they say the magic word.
The final product
Once we get all the configuration out of the way, here’s what setting up a remote pairing session will look like:
# HOST =========================================================================
# In one terminal window -------------------------------------------------------
# Open SSH reverse tunnel on VPS (elefantebistro.com)
bhorseman@scotch:~$ ssh elefantebistro.com -NR 2222:localhost:22

# In another -------------------------------------------------------------------
# Start a shared tmux session
bhorseman@scotch:~$ wemux

# GUEST ========================================================================
# Connect to host via tunnel set up above
# (drops straight into wemux on host, then terminates when detached)
tchavez@trees:~$ ssh -p 2222 pair@elefantebistro.com
# HOST =========================================================================
# In one terminal window -------------------------------------------------------
# Open ngrok tunnel
bhorseman@scotch:~$ ngrok tcp 22

ngrok by @inconshreveable                                                 (Ctrl+C to quit)

Session Status                online
Account                       Ryan Lue (Plan: Free)
Version                       2.2.8
Region                        United States (us)
Web Interface                 http://127.0.0.1:4040
Forwarding                    tcp://0.tcp.ngrok.io:13196 -> localhost:22

Connections                   ttl     opn     rt1     rt5     p50     p90
                              0       0       0.00    0.00    0.00    0.00

# In another -------------------------------------------------------------------
# Start a shared tmux session
bhorseman@scotch:~$ wemux

# GUEST ========================================================================
# Connect to host via tunnel set up above
# (drops straight into wemux on host, then terminates when detached)
tchavez@trees:~$ ssh -p 13196 pair@0.tcp.ngrok.io
Now Bojack and Todd are in business. They’re attached to the same tmux session on Bojack’s computer again, but this time, they can do it from anywhere in the world, and there’s nothing Todd can do to screw things up on Bojack’s computer (without trying really, really hard).
Step by Step, This Time
Show instructions for
I have my own public-facing SSH server (e.g., a VPS)
Step 0: Prerequisites
Dependencies
If you don’t have tmux already, get it.
In fact, get wemux and ngrok while you’re at it.
Enable SSH login
You should be able to run the following command without any errors:
$ ssh localhost
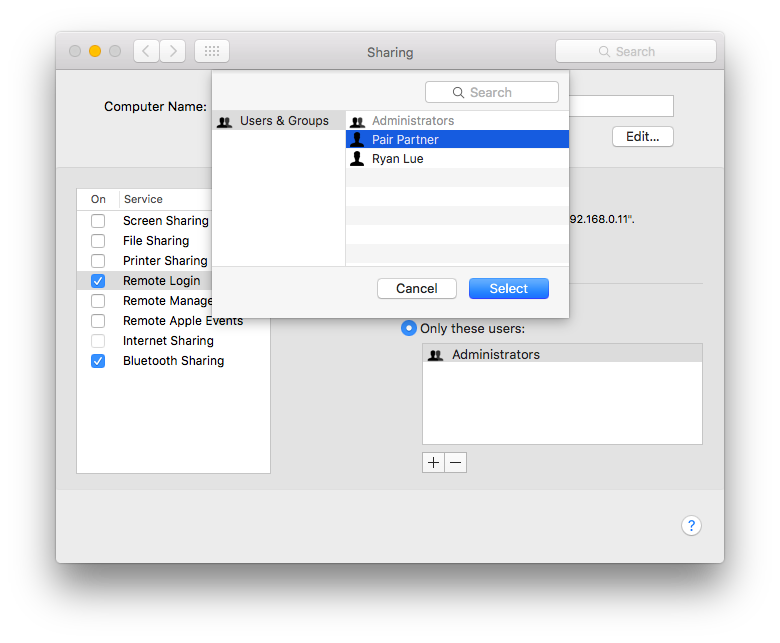
If it doesn’t work, check System Preferences > Sharing > Remote Login.
Setting up sshd is beyond the scope of this guide, so if you’re stuck here, get Bingin’™.
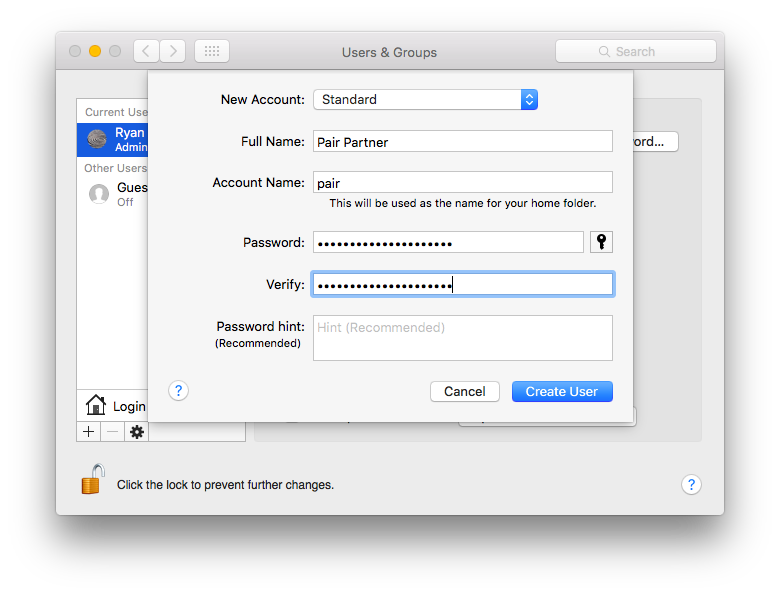
Step 1: Create a new user account
Find the new user dialog under System Preferences > Users & Groups:
Enable SSH login for the new account under System Preferences > Sharing > Remote Login > Allow access for:
$ sudo useradd -m pair
$ sudo passwd pair
At this point, you should be able to log in as your new user:
$ ssh pair@localhost
If not, be sure to check any AllowUsers/DenyUsers rules in
your sshd_config.
Step 2: Set up SSH authentication
We want to make sure that no one can ssh into this user account but the people we made it for. The best way to do that is to disable password authentication and use public key authentication instead.
# /private/etc/ssh/sshd_config

# for a single user
Match user pair
	PasswordAuthentication no
	KbdInteractiveAuthentication no

# or, for all users
PasswordAuthentication no
ChallengeResponseAuthentication no
# /etc/ssh/sshd_config

# for a single user
Match user pair
	PasswordAuthentication no
	KbdInteractiveAuthentication no

# or, for all users
PasswordAuthentication no
ChallengeResponseAuthentication no
Now, you can authorize your pair programming partners by adding their SSH
public keys to the authorized_keys file:
# /Users/pair/.ssh/authorized_keys

ssh-rsa AAAAB3NzaC1yc2EAAAADAQABAAACAQDM4+Iuo5QijFdZ4xUPwuluZArbpqKqZzFyP4G4IyVqiCdjI9ZKA+CuUBR78KmnhV1HqmKsCeOSJHkt9bevUr/5GwinS8zKB3kzjb7IpWtU+WH0vEjRpPrdzmmCaz4vdY1R9CrkGzWH2UASrKOCsbgeR+pCqwb0nf9D3hBQ3MzcXEHHG8uFGr5/byCnphZZfV/AjDfnQkxgw1EGNMJBUeZnoMn/jx3QgQdfqsVUlICJ0b2SeWjSN+PIxiZgPSlAY3v0ERsx55xs7AnbdqusyFpGHXVG/biz9KpxlejzH+ZNtGNIv+c9aLHGCgmM2KTu7QmjAdmj1JBdjq6czV0LvfqqH25ksjvSEAvXhfSaAFr5UJnkjkd1v4HSfaxkIixXd7z4lLSB1DxqieaRStmUo1uf6ybiTcYPSP8YFOBe0IdQ9PbeGe32g+lZ5fng0+uxZHl3pAMuC8/7kREUbRHjOjPu5n6dWNvTTJ4pwv2OGA3gd5fxycARyZiAQDt0UEGTTLXc/519Y8HBoSNRI8y6q8CsGIaR7u9UhPA+/ABVIPpda6obN2aOnV/RVfatKPn0esmKkiV+pfL+FWnzCHjU74nc5DSCxTghM3IbondphYzfSnZlmYW7cj/Gq+oRAB1mKRcYhpt0U3AcS796QsUpOoDdeYnR7wZWysrftp4VAK2O6Q== tchavez@pblivin.com
# /home/pair/.ssh/authorized_keys

ssh-rsa AAAAB3NzaC1yc2EAAAADAQABAAACAQDM4+Iuo5QijFdZ4xUPwuluZArbpqKqZzFyP4G4IyVqiCdjI9ZKA+CuUBR78KmnhV1HqmKsCeOSJHkt9bevUr/5GwinS8zKB3kzjb7IpWtU+WH0vEjRpPrdzmmCaz4vdY1R9CrkGzWH2UASrKOCsbgeR+pCqwb0nf9D3hBQ3MzcXEHHG8uFGr5/byCnphZZfV/AjDfnQkxgw1EGNMJBUeZnoMn/jx3QgQdfqsVUlICJ0b2SeWjSN+PIxiZgPSlAY3v0ERsx55xs7AnbdqusyFpGHXVG/biz9KpxlejzH+ZNtGNIv+c9aLHGCgmM2KTu7QmjAdmj1JBdjq6czV0LvfqqH25ksjvSEAvXhfSaAFr5UJnkjkd1v4HSfaxkIixXd7z4lLSB1DxqieaRStmUo1uf6ybiTcYPSP8YFOBe0IdQ9PbeGe32g+lZ5fng0+uxZHl3pAMuC8/7kREUbRHjOjPu5n6dWNvTTJ4pwv2OGA3gd5fxycARyZiAQDt0UEGTTLXc/519Y8HBoSNRI8y6q8CsGIaR7u9UhPA+/ABVIPpda6obN2aOnV/RVfatKPn0esmKkiV+pfL+FWnzCHjU74nc5DSCxTghM3IbondphYzfSnZlmYW7cj/Gq+oRAB1mKRcYhpt0U3AcS796QsUpOoDdeYnR7wZWysrftp4VAK2O6Q== tchavez@pblivin.com
Try this with your own SSH public key. Then, verify that you can log in without a password:
$ ssh pair@localhost
Step 3: Set up wemux
To use wemux, first whitelist the users that are allowed to create new, multi-user tmux sessions (in this case, just you):2
# /usr/local/etc/wemux.conf

host_list=(bhorseman)
Now, you should be able to create a wemux session, and pair should be able
to join it:
# In one terminal window -------------------------------------------------------
bhorseman@scotch:~$ wemux      # short for `wemux start`

# In another -------------------------------------------------------------------
bhorseman@scotch:~$ ssh pair@localhost
Password:
pair@scotch:~$ wemux           # short for `wemux mirror` (configurable)
Step 4: Castrate pair
So now the new user can log into our system to jump on a shared tmux session, which is great. But he can also do a lot of other things he doesn’t need to, like storing files and running programs, so we’re going to short circuit any attempts to do anything that’s not wemux.
Consider this step optional but strongly advised.3
We’re going to use a three-line script to drop the user straight into wemux and then terminate the session once it’s finished. The trick is making sure that it always (always always) runs when it’s supposed to. So where do we put it?
There are two scripts that bash can source on startup: .profile is for
login shells, while .bashrc is for interactive, non-login
shells. To illustrate:
$ ssh pair@localhost       # this sources .profile
$ ssh pair@localhost date  # this sources .bashrc

# .profile can be bypassed like so, but .bashrc gets invoked instead:
$ ssh pair@localhost "bash --noprofile"
As far as I know, there is no way to bypass .bashrc. So if we put the
script there and then call .bashrc from within .profile, it should always
run, no matter what.
# /Users/pair/.profile

source "$HOME/.bashrc"
# /Users/pair/.bashrc

export PATH="/usr/local/bin:$PATH"  # get tmux and wemux on your $PATH
wemux mirror                        # drop into a tmux read-only client
exit
# /home/pair/.profile

source "$HOME/.bashrc"
# /home/pair/.bashrc

export PATH="/usr/local/bin:$PATH"  # get tmux and wemux on your $PATH
wemux mirror                        # drop into a tmux read-only client
exit
I’ve been wrong before, though, so it wouldn’t hurt to go…
…a little overkill
We could even take it a step further and amend the authorized_keys file from
the previous step:
# /Users/pair/.ssh/authorized_keys

command="" ssh-rsa AAAAB3NzaC1yc2EAAAADAQABAAACAQDM4+Iuo5QijFdZ4xUPwuluZArbpqKqZzFyP4G4IyVqiCdjI9ZKA+CuUBR78KmnhV1HqmKsCeOSJHkt9bevUr/5GwinS8zKB3kzjb7IpWtU+WH0vEjRpPrdzmmCaz4vdY1R9CrkGzWH2UASrKOCsbgeR+pCqwb0nf9D3hBQ3MzcXEHHG8uFGr5/byCnphZZfV/AjDfnQkxgw1EGNMJBUeZnoMn/jx3QgQdfqsVUlICJ0b2SeWjSN+PIxiZgPSlAY3v0ERsx55xs7AnbdqusyFpGHXVG/biz9KpxlejzH+ZNtGNIv+c9aLHGCgmM2KTu7QmjAdmj1JBdjq6czV0LvfqqH25ksjvSEAvXhfSaAFr5UJnkjkd1v4HSfaxkIixXd7z4lLSB1DxqieaRStmUo1uf6ybiTcYPSP8YFOBe0IdQ9PbeGe32g+lZ5fng0+uxZHl3pAMuC8/7kREUbRHjOjPu5n6dWNvTTJ4pwv2OGA3gd5fxycARyZiAQDt0UEGTTLXc/519Y8HBoSNRI8y6q8CsGIaR7u9UhPA+/ABVIPpda6obN2aOnV/RVfatKPn0esmKkiV+pfL+FWnzCHjU74nc5DSCxTghM3IbondphYzfSnZlmYW7cj/Gq+oRAB1mKRcYhpt0U3AcS796QsUpOoDdeYnR7wZWysrftp4VAK2O6Q== tchavez@pblivin.com
# /home/pair/.ssh/authorized_keys

command="" ssh-rsa AAAAB3NzaC1yc2EAAAADAQABAAACAQDM4+Iuo5QijFdZ4xUPwuluZArbpqKqZzFyP4G4IyVqiCdjI9ZKA+CuUBR78KmnhV1HqmKsCeOSJHkt9bevUr/5GwinS8zKB3kzjb7IpWtU+WH0vEjRpPrdzmmCaz4vdY1R9CrkGzWH2UASrKOCsbgeR+pCqwb0nf9D3hBQ3MzcXEHHG8uFGr5/byCnphZZfV/AjDfnQkxgw1EGNMJBUeZnoMn/jx3QgQdfqsVUlICJ0b2SeWjSN+PIxiZgPSlAY3v0ERsx55xs7AnbdqusyFpGHXVG/biz9KpxlejzH+ZNtGNIv+c9aLHGCgmM2KTu7QmjAdmj1JBdjq6czV0LvfqqH25ksjvSEAvXhfSaAFr5UJnkjkd1v4HSfaxkIixXd7z4lLSB1DxqieaRStmUo1uf6ybiTcYPSP8YFOBe0IdQ9PbeGe32g+lZ5fng0+uxZHl3pAMuC8/7kREUbRHjOjPu5n6dWNvTTJ4pwv2OGA3gd5fxycARyZiAQDt0UEGTTLXc/519Y8HBoSNRI8y6q8CsGIaR7u9UhPA+/ABVIPpda6obN2aOnV/RVfatKPn0esmKkiV+pfL+FWnzCHjU74nc5DSCxTghM3IbondphYzfSnZlmYW7cj/Gq+oRAB1mKRcYhpt0U3AcS796QsUpOoDdeYnR7wZWysrftp4VAK2O6Q== tchavez@pblivin.com
When the command option is set on a public key, client sessions initiated
with that key will only run the specified command (i.e., even if you try to
create a login session or execute a different command, the server will ignore
it and run the specified command instead).
That means that even if someone got a hold of Todd’s SSH key without his
knowing, and even if they knew when we were scheduled to pair, and even if
they found a way to bypass .bashrc, they’d still be effectively locked out
of the server. (See man sshd for more.)
Confirm that everything works as expected by trying to log in as pair over
SSH:
$ ssh pair@localhost            # both of these commands should exit immediately
$ ssh pair@localhost touch foo  # unless there is a wemux session to attach to
Step 5: Accept incoming connections on localhost
In order to expose localhost to the public, we’ll set up port forwarding
from a separate, public-facing SSH server (in other words, a reverse
tunnel). Add the following
rules to your remote server’s sshd_config:4
# /etc/ssh/sshd_config

Match user bhorseman            # optional (applies subsequent settings on the matched user account only)
	AllowTcpForwarding yes  # probably redundant (enabled by default)
	GatewayPorts yes        # important! (disabled by default)
Then, restart the SSH daemon and set aside a port to use on the firewall:
$ sudo service ssh restart
$ sudo ufw allow 2222
Open sesame
Now, you should be able to receive incoming connections with the following command:
$ ssh -NR 2222:localhost:22 elefantebistro.com
If that’s too much to remember, create an alias for this connection:
# ~/.ssh/config

Host          elefante
HostName      elefantebistro.com
User          bhorseman
RemoteForward 2222 localhost:22
so that you can open that same tunnel with:
$ ssh -N elefante
Confirm that it works by ssh-ing in from another terminal window:
$ ssh -p 2222 elefantebistro.com
We’ll be using ngrok to expose localhost to the public. ngrok is one of a
number of freemium services offering ad hoc port forwarding from their
public servers to users’ own devices (a.k.a. tunneling).
To forward SSH (port 22) over ngrok, you’ll need an account. Once you’re all set up with them, just open up a tunnel with their CLI utility:
$ ngrok tcp 22

ngrok by @inconshreveable                                                 (Ctrl+C to quit)

Session Status                online
Account                       Ryan Lue (Plan: Free)
Version                       2.2.8
Region                        United States (us)
Web Interface                 http://127.0.0.1:4040
Forwarding                    tcp://0.tcp.ngrok.io:13196 -> localhost:22

Connections                   ttl     opn     rt1     rt5     p50     p90
                              0       0       0.00    0.00    0.00    0.00
Final dress rehearsal
With that, all the necessary machinery should be in place for a seamless pairing experience. Take it for a test drive as outlined above.
If you run into any problems, I’d love to hear about them.
Step 6: 🍾🍾🍾 Celebrate! 🎉🎉🎉
Now, you’re ready to pair. Go team! 🙌
Bonus: Communication
If you’re in the same country, just use the dang telephone.
Bonus: Sharing a browser window
If you’re doing web development, use tunneling to expose your HTTP development server to the public. For instance, start the Rails server in one window:
$ rails server
=> Booting Puma
=> Rails 5.1.4 application starting in development
=> Run `rails server -h` for more startup options
Puma starting in single mode...
* Version 3.11.0 (ruby 2.5.0-p0), codename: Love Song
* Min threads: 5, max threads: 5
* Environment: development
* Listening on tcp://0.0.0.0:3000
Use Ctrl-C to stop
and open a tunnel in another:
$ ssh -NR 8080:localhost:3000 elefantebistro.com
$ ngrok http 3000
Now your development site will be available at http://elefantebistro.com:8080. (Just be sure to open the firewall on 8080 first!) something like http://b4067a18.ngrok.io. (Note that to tunnel SSH and HTTP connections simultaneously, you’ll need to dig into your ngrok configuration.)
-
At this point, you may be anticipating potential solutions. Of course, there are many different ways around these problems, but I prefer the approach outlined above over others I’ve explored:
Docker
Docker (or alternately, a virtual machine) is a bulletproof solution to the security issues presented in this guide, but a Docker container is not your usual development environment. Docker was made to create and share fully self-contained production environments for complex applications, and it’s very good at that. As a result, Docker images are static and must be repackaged with each new change. And development environments change constantly.
Of course, you could automate the process of mirroring your development environment as a Docker image on a regular basis, but I don’t think the security benefit outweighs the overhead.
Pair directly on the remote SSH server
That would certainly make things easier from a security standpoint (assuming you’re okay granting your partner access to the server), but then both partners have to deal with network latency. And just like with Docker, there’s extra work involved in keeping your development environment up-to-date in two places.
SSH jail
Setting up a chroot jail on the
pairaccount is probably not a bad idea, but it’s a lot of work. jailkit can simplify the process, but there’s not a lot of high-level documentation, and it raises a perplexing error on macOS. -
wemux also supports settings that limit how much a client can do when connected to a shared session. This is a good time to consider whether you trust Todd enough to let him take the wheel (again, think screenshare vs. remote desktop). Remember: the tmux session is on your user account; if you let Todd do anything, you’re letting him do everything (short of
sudo).Personally, I’m playing it safe and prohibiting anything other than “mirror mode” (read-only sessions) in wemux:
# /usr/local/etc/wemux.conf allow_pair_mode="false" allow_rogue_mode="false" -
This was not part of our earlier risk analysis, but there are rules about these things — and anyway, it makes the experience look a little more seamless from the outside. ↩
-
What do these rules do?
-
AllowTcpForwardingenables tunneling in general, and is probably already on. With it, you can do this:# connect to SSH server, opening reverse tunnel bhorseman@scotch:~$ ssh -R 2222:localhost:22 elefantebistro.com Last login: Tue Jan 16 10:21:54 2018 from 192.168.1.5 # connect back to client machine over forwarded port bhorseman@elefante:~$ ssh -p 2222 localhost Last login: Mon Jan 15 18:41:32 2018 from 192.168.1.3 # localhost:2222 on the SSH server sends us back to the client bhorseman@scotch:~$ -
GatewayPortsallows the tunnel to be accessed from outside the server itself. With it, you can do this:# In one terminal window ----------------------------------------------------- # connect to SSH server, opening reverse tunnel bhorseman@scotch:~$ ssh -R 2222:localhost:22 elefantebistro.com Last login: Tue Jan 16 10:21:54 2018 from 192.168.1.5 bhorseman@elefante:~$ # In another ----------------------------------------------------------------- # connect to own machine via tunnel at SSH server bhorseman@scotch:~$ ssh -p 2222 elefantebistro.com Last login: Mon Jan 15 18:41:32 2018 from ::1 # elefantebistro.com:2222 sends us to the machine that opened the tunnel bhorseman@scotch:~$
-